Pages

Showing posts with label Colors - White. Show all posts

Monday, July 9, 2012

Sure about that? 4th of July nails fails X2


Above is Sally Hansen Diamond Chrome with Love my Nails Glory. 2 coats of each and a coat of TC. That's what I ended up wearing for the real Independence day. Below is another 4th of July attempt that did not turn out as planned. 

I started with 3 coats of Wet n Wild White, then added a coat of Clear and sprinkled on a mix of some pretty red and blue bar glitter that I found at Micheal's Crafts store.... The glitter bled into the clear polish - boo - but I will work with this and try again with another glitter/polish combo. It does have an interesting look to it but I was hoping for some stunning red and blue bar glitter on a pure white base.

On my ring nails I added some silver stars..... that turned out all right. Also these are my real nails, I was doing some fun paper mache projects during the holiday weekend as well as digging in the garden.

 Index nail ( far right ) has a coat of Clear polish - which made the glitter bleed....

glitter I used

and the finished Mani ( lol )
o


Wednesday, July 4, 2012

So close..... Canada day nails.....


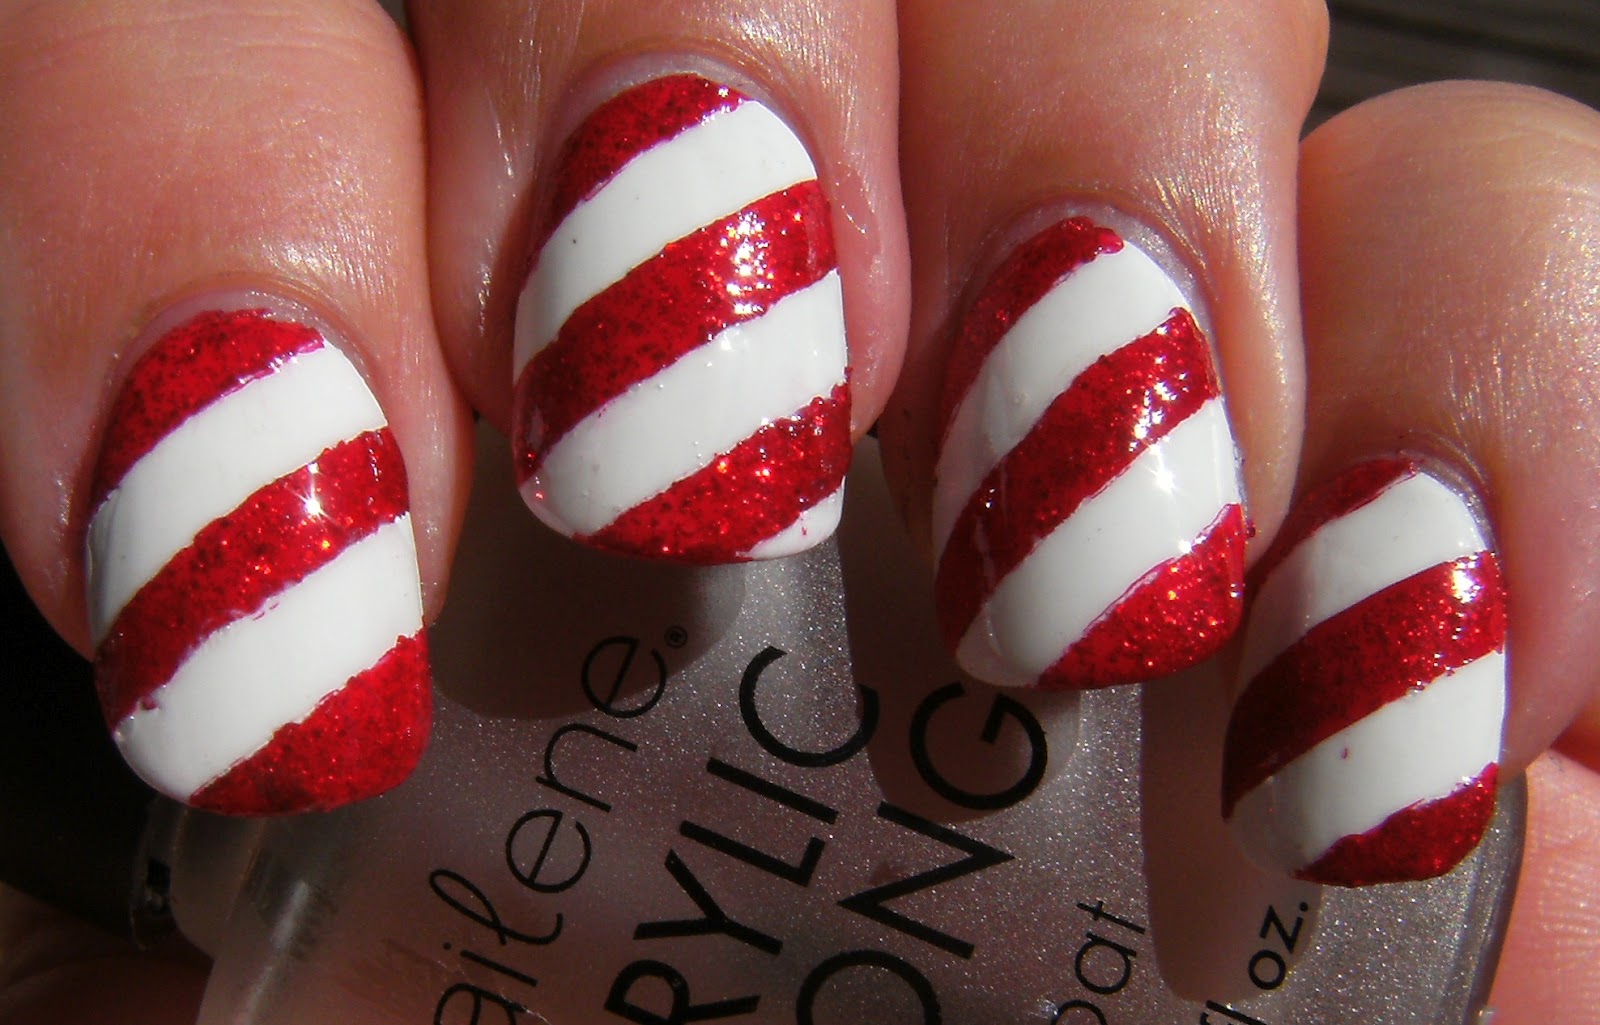
well, it's sorta Canada day-ish... just 3 days late. This was 2 coats of Billie Cosmetics French White. I applied fancy blue office tape and swiped on a bright red polish so that I would only have to use 1 coat of LA Colors Stripe polish in Red Glitter. When it was dry I peeled off the tape and added TC..... It was ridiculously humid out when I did this mani ( it still is ) and I did not want to press down on the tape - so my lines are not as crisp as I would have liked.....

I have to add that coming up with inspiring 4th of July nails ( USA) is easier than Canada Day nails

Happy Independace Day!


I used blue office tape to mark off the red sections, then slapped on a bright red polish so I would only have to use 1 'coat' of the la colors stripe polish.

o

Wednesday, June 20, 2012

Will autopost work today?


.........we will see at 7:00 a.m. Central Time

 Todays nails are a copy inspired by Thriszha over at Fab Ur Nails - she posted this awesome sticks and stones mani...., a few weeks ago. I copied the polish part using nail art stipes polish & added a coat of TC. Love the black and white glitter she used!

I basically brushed on these four colours using nail art polish randomly over my nails. I will definitly try this look again in the future, with a glitter top coat.


stuff I used

whoops @ my middle nail ~ lol
o


Monday, July 4, 2011

Independance Day Manicure & New Blogs


a simple sponge mani for Independence Day

but first, new blogs! I have added these to my blog roll. I figured out how to fix the 'follow' issue but my photo is fuzzy and wonky & I have given up trying to fix it..

 my nail topia

lively lacquer

 polish amor

asymmetrical beauty

 the nail polish rehab candidate

 a little glitter and sparkle

 i came i saw i bought

 blinger nails

 marshee  

 red hair and black nail polish

 nothing but nail polish

 shatter me claire 

if you are a new nail blogger, please don't be shy! link your blog in my comments and I will add you to my blog roll. Also for some reason.... if you add text before a photo; your blog will not have a picture in some peoples blog rolls.....just a note = i did notice that people seem to click on posts that have a photo along with their blogs name.

these types of sheer sparkly polish`s are life savers! They disguise many flaws as well as lumpy-ness and ridges. This is a discontinued Wet n Wild Rock Solid called sparkling diamonds

stuff I used for this red white & blue sponge mani


I started with a base of Sally Hansen Chrome in diamond, then sponged on white diagonally across my nails, added Sally Hansen X-treme wear Red Carpet at the base and Sally Hansen X-treme Wear Blue It at the tips. I used 1 coat of Wet n Wild Sparkling Diamonds then finished up with a coat of Nailene Acrylic Strong Top Coat.

I started with a base of silver Chrome from Sally Hansen - I like using this as a 'base'

sponged on the white diagonally and centered across my nails


added the red at the base and blue at the tips


viola! Happy fourth of July


❤

Sunday, October 24, 2010

Fall-Nailz with Stripe-Rite polish & Candy Corn take 2


Sally Hansen Dark Chocolate is a very rich deep brown polish with subtle copper micro-shimmer.  Here is 2 coats with 2 copper-ish Stripe Rite polish's and some cool copper hex glitter from a floral embellishment from my MOM. It's really hard to find any type of larger HEX glitter in these parts, I love large hex glitter for crafts but I rarely see it for sale anywhere.....

These Stripe Rite polish's are awesome! They can be found at Sally Beauty supply, and are so easy to use. I have already done a 'look' with these recently but wanted to play with them again.

Here is my mani for the day, along with some free-hand Candy Corn nails I did earlier in the week.


L-R Sally Hansen New Lengths Dark Chocolate, Stripe Rite polish`s and Nailene Acrylic Strong TC
{ # 812 and #903 for the Stripe-Rite polish's they don't have names.....}

close up


 Sally Hansen New Lengths Dark Chocolate


Those copper coil things are where I got the Copper Hex glitter. My mom finds the COOLEST stuff!
( The hex glitter gave off so much reflection that I could not get a photo of my nails, and the copper coil things from my MOM at the same time.)


Candy Corn Nails take 2


Yellow base color Sally Hansen Mellow Yellow, Orange, NYC Spring Street, and Billie French White for the tips... All free hand and with Claire's Matte Top Coat.


.... okay, its not that bad, but the Orange bled through the white portion, THAT NYC ORANGE is insanly bright! I will definitly layer it over white some day - I think it can hold it's own against some of the popular bright orange neon polish's out there.

♥

Sunday, October 17, 2010

♥ Some halloween Fails - Candy Corn and Ghosts ♥


This looks really textured and I think thats what I didn't like about it. The white polish I sponged on the tips dried waaaaaaaaaaay too fast! I will definitely do another candy corn mani; but I will be using nail tip guides to get a cleaner crisper line. I usually love the sponge mani's that I do. But this one......


N.Y.C. Spring Street, Sally Hansen Mellow Yellow, and Billie White.


Please ignore my pinky. When working with the dotting tool, do not let the polish sit out too long - as it starts to dry it will get gloppy and stringy. This dotting tool is good for making free-form shapes, I will definitely implement it for other shapes besides single dots in the future. I think these Ghosts are cute, but all I see is the PAC-MAN ghosts.... not Halloween ghosts. I think that if I traced around my nails, along the sides and cuticles, they would look more ghost like. Back to the drawing board!


 This was 2 coats of Billie White with 1 coat of Nailene Acrylic Strong Top Coat. I actually wore just plain white for the morning, and then tried out this ghost look.  Of course I had to add crystals! (actually these are the plastic crystals form the Dollar-Rama)


 Nailene TC, Wet n' Wild Black, Billie French White

I cut out thin tip guides with these patterned scissors

♥


Tuesday, June 1, 2010

♥ Billie - 'Rose' ♥

2 coats Billie White and 3 coats of Billie Rose - no Top Coat

 Wow this is bright - The sunshine picture of this is something else! Taking photos of bright neon's and fluorescent polish's is next to impossible, they really do look their best in the shade anyway, so thats how I will photograph them from now on. 

I started with 2 coats of Billie French White, then a coat of Nailene Acrylic Strong Top Coat and made sure it was dry. I then applied 3 thin coats of Billie Rose, which thankfully dried extremely fast. I kinda like the weird finish these Billie fluorescent polish's have when they dry; but this wont last long, hence the no top coat, I had some things to paint and fix-up so I just enjoyed this burst of colour for the afternoon only!

HERE is the Page with all my Billie polish's along with some info on where to buy these in Canada ( lucky Ontario Girls) and HERE is the last time I wore this polish = Its so nice to see how well my photography skillz have grown since I started blogging♥

Shade

Sun...... er......ummmmmmmmmmm

@ 2 coats fo Billie French White with 1 coat of Nailene Acrylic Strong Top Coat

Indoor Fluorescent

Indoor Fluorescent
♥

Thursday, March 25, 2010

♥ Claires Dream Catcher & Nailene 'Skinny' French tip pen ♥


Claire's Dream Catcher 3 coats & Nailene T.C with Nailene white french Tip Pen

It was really hard for me to get a great photo of the beautiful light green micro-shimmer in this polish. This is a really pretty polish color that came out around New Years (I think). It required 3 coats and the next time I wear it I will definitely layer it over another color.

For this mani, I applied 2 coats of 'Dream Catcher' and 1 coat of Nailene Acrylic Strong Top Coat. I wore this plain for the day, then decided to dress it up with a white french tip pen. I applied the very curved nail stickers to the corner of my nails, and added 2 'coats' of the white french tip pen, on some nails I used 3 'coats' becuase I dropped my camera string onto my still wet nails (Dang!)

When the white was dry, i carefully removed the stickers and applied T.C. over the white area, extending a mm or two past the white tip area and applied T.C. tot he edge of my nails as well & let that dry, when everything is fully dry I applied a coat of T.C. over my entire nail.


- Stuff I used -


@ 3 coats of Claire's 'Dream Catcher' with 1 coat of Nailene T.C.

Apply curved French Tip Guides

@ 2 to 3 swiped of the Nailene 'Skinny' French tip pen in white
Remove Stickers apply T.C. to white tip area & face/edge of nail..... covering the ridge where the white tip meets the nail bed and extending a few mm past the ridge.


~ Viola ~