Pages

Showing posts with label Polish Finish = Metallic. Show all posts

Thursday, April 3, 2014

Joe Fresh Copper


 This evenings mani is 3 thin coats of Joe Fresh Copper ---- Joe Fresh has a pretty extensive line of polish. These are 3 for $10 @ Loblaw's/Superstore. Most of the newer polishes have removable caps - I suck at applying polish with those big round handles.......


In the bottle this polish has an amazing colour shift, but didn't show up as strong on my nails. I still really love this colour, it is a beautiful strong metallic copper. This was 3 coats, no TC.


Next time I wear this I will be layering it over a dark Forest green or even Wet n Wild Black, maybe that will make that pretty green appear.


 Joe Fresh Copper ---- 3 thin coats
 
 ..........and thank goodness - these newer bottle have removable caps with a thinner brush handle

....... 

--- I can see some of that green ---


 I used a crackle/shatter polish from Ardene to dress this up. To get this look I painted it on the diagonal, I like how it turned out.


 ....... and a few more glamour shots


 o


Friday, July 12, 2013

Midnight Blue - Deja Vu


......try'na catch up on posting, while spitting out dope rhymes, just for you...........

This mani is 3 coats of Sinful Colors Midnight Blue --- a gorgeous blue, perfect application, dried fast, it's just awesome! If I applied it too thick there was some notable metallic line, due to the rich metallic properties of this polish. I have read that this polish stains so I did the white school glue base so I can peel it right off when I am finished with it this evening. I picked this up at a Dollar Tree in the U.S.A.            ( yes- a U.S.A. haul post is in the works)

I'm planning a deep metallic blue polish show-down in the near future =  we'll see how this measures up to my all time favorite - N.Y.C. Skin Tight Denim.


On it's own Sinful Colors Midnight Blue is beautiful - but I wanted to layer Pure Ice Deja Vu over it for the day. I tried every conceivable lighting and camera trick to bring out the purple colour shift in Pure Ice Deja Vu but couldn't get it to happen. In photos Pure Ice Deja Vu looks like a  blue glass-flecked polish but there is a strong and pretty purple colour shift/duo-chrome-ey-ness happening. The formula on Deja Vu was thin; so this is 3 coats layered over Sinful Colors Midnight Blue.

None of my photos have TC, and THANK GOODNESS there is no sun shining today- it is ridiculously hot out and I am hoping it will rain and cool off soon.


okay I lied; this one photo is in the brief amount of sunshine we had today....and the first photo posted also has a bit of sun in it ( i love the sunshine but there has been a bit of a heat wave in my part of the country in the last 2 weeks ..... )
o


Saturday, March 19, 2011

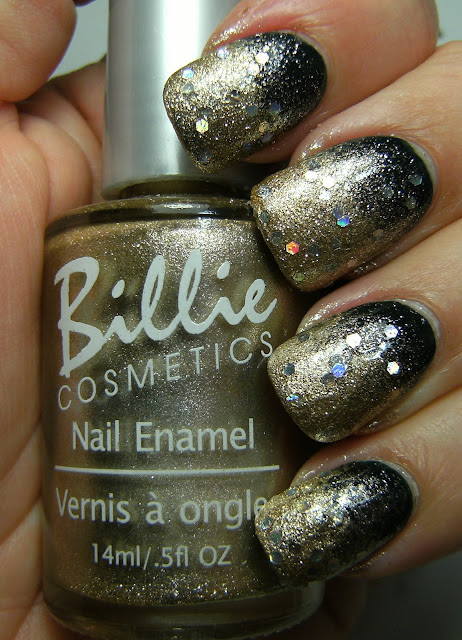
A Simple Gold Sponge Mani


The polish's I used for this look were Icing Manic Monday, Billie Gold, Icing no-name gold shimmer and ELF Golden Goddess. I sponged the Billie Gold metallic polish over my nails, then sponged on the no-name Icing polish over that and -extending past- the gold, then applied 1 coat of ELF Golden Goddess. I need another coat or two of Top Coat for ELF Golden Goddess..... it looks really lumpy plus the base on it is matte = but it dries fast for me so I am not complaining.


Icing Manic Monday - a dark, dark green

Billie Gold - thick metallic gold, very opaque & dries fast

un-named Icing polish - gold shimmer

The gold hearts did not hang on overnight..... many of them fell off. So today I removed what was still hanging on and sponged over my nails.


Polish's I used for this Mani
L-R Icing Manic Monday, Billie Gold, Icing no-name gold shimmer, ELF Golden Goddess

I sponged 3/4 of my nails with Billie Gold, and thick gold metallic polish.


L-R
* Sponged 3/4 of nail with Billie Gold
* Sponged on a sheer, shimmery gold polish, leaving a small area of the green base polish
* added 1 coat of ELF Golden Goddess
* Added Top Coat


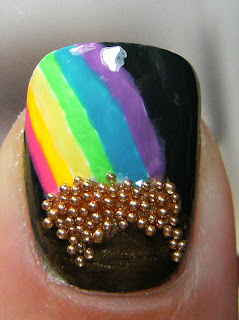
and my Pot Of Gold St Patrick's Day from yesterday....... those little beads surprised me, I thought they would all fall off, but a surprising amount stayed on, even though I did alot of crafty things today.

Before                                                                                                 After


My nail is at different angels, so it looks like a totally different more rounded shape. I didn't think of doing a before/after till I loaded these photos. I think I would like these beads in clear, and pastel colours. Nail polish dissolves the finish on non NAIL ART micro-beads.

I set these into wet Top Coat but the colour still bled.

♥


Monday, June 14, 2010

♥ Claire's Platinum & Claire's Clean Slate ♥

Sponge mani Claire's Clean Slate and Claire's Platinum, with 2 coats of Wet n' Wild Kaleidoscope

I love manis that look great indoors under low not so awesome lighting

I cant believe that I have only added 4 posts to my blog in these 14 days of June! Here is some quick simple nail art I did to stretch my Claire's Clean Slate mani that I wore all weekend. I tried to leave my nail boo-boo uncovered but I needed to do my nails, I needed colour!  I applied a liberal amount of glue over the crack, and then buffed it out. So far it is healing and there are no signs of any problems. THANK GOODNESS. I cant stand not wearing my fake nails, but thankfully my real nails a re pretty long right now, just not in the best of shape. I think this sponge with glitter manicure is a good example of how to hide nails that are in sorta "rough shape"

So- this was 2 coats of Claire's Clean Slate, followed by Claire's Platinum that I sponged on. I think I covered up too much of the base shade, Claire's Platinum. I added 2 coats of Wet n' Wild Kaleidoscope - I love the square holographic glitter in this polish.

These are my real nails and the surface is in rough shape. My real nails often bend  because they are thin and pliable, and this leaves a lump where this bend happens. I have added a photo below of my nail completely bending due to its thinness..... Hope no-one is sick of scientific nail stuff becuase I have a few more neat things to post.

These metallic Claire's polish's have all been awesome. I think they came out before X-mas time in Canada and all the ones I have are fabulous, they apply easily and only need two coats for opacity. They have held up remarkably well each time I have worn them and the colours are beautiful. I am not sure which ones I am missing, but hope I have them all.

The photos towards the end are after to days of rough wear and tear wearing Claire's Clean Slate. I used my regular Top Coat Nailene Acrylic Strong as a base coat, then applied 2 coats of Clean Slate followed by 2 coats of Nailene Acrylic Strong Top Coat wrapping the free edge of my nail with Top Coat. BUT - before I painted my nails I also applied a small drop of Nailene Pink Nail Glue underneath my nails and spread it around with an orange wood stick to create a harder and tougher free edge.

Whenever I am not wearing false nails this is how I paint my nails. I very rarely get polish chips or tip wear.

w/ Clean Slate

w/ Platinum

w/ Wn'W Kaleidoscope

Although Nihrida posted a fabulous tutorial on how to make colour drops, I could not do it......Its just too early for complex computer stuff.... so I present colour squares.

Left ~ Clean Slate - Right ~ Platinum

Claire's Platinum & Claire's Clean Slate

Claire's Clean Slate - 2 coats with T.C.


check out how bendy my nails are;


Shade

Shade with flash
♥


Friday, May 7, 2010

Claire's - '14 Karats' with Nailene Black French Tip Pen & Fing'rs Nail Stickers

Claire's - '14 Karats'  2 coats with Nailene Black French Tip Pen & Fing'rs Nail Stickers
 
 
Claire's has ( or had ) a few of these foil-ish metallic's that I think are great. They apply well and are generally 2 coats. I love how after applying a top coat most of the brush strokes disappear ~ It's neat. Here I have used 2 coats of Claire's '14 Karats' and a coat of Nailene Acrylic Strong Top Coat. After sporting this fabulous colour for the afternoon, I applied a regular curved french tip guide up-side down and on the diagonal across the tip of my nail. Then I used Nailene Black French Tip Pen but as you can see in the close-ups = I totally fudged this up and probably should have not been blabbing on the phone and riffling through boxes at the same time.  I saved this with these cute butterfly stickers I found at walmart.
 
When I was certain everything was dry and my stickers were in the right spot, I slapped on another coat of Nailene acrylic Strong Top coat and called it a day.
 
 indoor fluorescent

Romantic Lamp Light

 indoor fluorescent

So; on my thumb at the very bottom, is without top coat and the brush strokes are very evident (which I think is cool with metallic and foil finish polish it looks industrial-) but with a coat of T.C. the shimmery-ness of this polish is more evident and the brush strokes are less evident.
 
Romantic Lamp Light
Stuff I used - Claire's 14 Karats, Nailene Acrylic Strong Top Coat, Black French Tip Pen & Fing'rs Stickers


@ 2 coats w/ T.C. = no clean-up
apply French Tip Guides
@ A swipe of Nailene Black French Tip Pen........ wait for it to dry and touch up if necessary. I tried to touch it up but resorted to awesome butterfly nail stickers.
Apply adorable nail stickers
When everything is dry, apply 2 coats of T.C. when using these Nailene french tip pens, a top coat is needed to seal it in. It is a water based product and must have a top coat or a sheer polish to protect it.


♥